
My favorite project bag is this lotus-shaped drawstring bag I own. It’s square with some design features that reminds me of Japanese origami, the beautiful art of paper folding. I love the way it folds in on itself like those old fortune teller paper games we used to play in school when we were children. The design is both simple yet clever. Pulling the drawstring shuts the bag and creates handles for carrying, all without losing its basic shape. I knew this bag design would be perfect for the vintage fabric my grandmother bought while traveling in India in the ’70s, but when I looked around the Internet in an attempt to make it, I couldn’t find a pattern or tutorial for the design I liked anywhere. I really wanted to have it replicated, so I just decided to write my own pattern! I’m a rudimentary sewer myself, so I assure you this pattern isn’t hard and will gently stretch your abilities. Let’s get sewing!
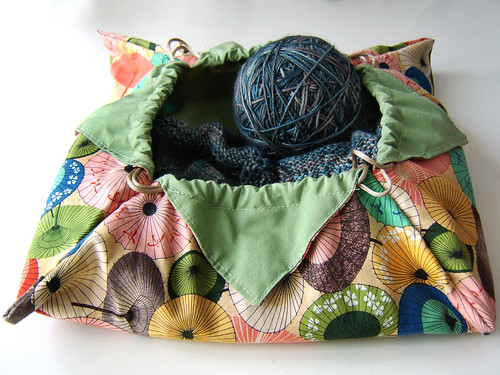
Origami Lotus Project Bag with yarn being knit into a shawl inside of it
You’ll need two matching squares of fabric that are roughly 18 inches square and some matching ribbon. The final product, when all said and done, is going to have a 12-inch wide flat bottom. Note: If you use squares of fabric that are larger you will make a larger bag and if you use squares that are smaller your bag will, consequently, be smaller.
First, take the two pieces of complementary fabrics and place the designs facing each other so you see the wrong side. If you have thin fabrics I recommend added a layer of interfacing of some sort for added strength. Sew the two fabrics together like you would for a pillowcase, leaving yourself a small hole. Then flip the fabric inside-out. Ta-da! Your fabrics are all sewn together and look like a flat, er…thicker piece of fabric. Don’t worry, we’re getting there.
Second, iron your fabric so that it’s easier to work with. This is where the fabric starts to look like origami, and as the Japanese masters will tell you, trying to fold wrinkled paper (or fabric) never works well. Before you start folding, however, we’re going to sew a nice little edging on the flat piece of pillowcase fabric to make it look finished and to keep the seam from sliding around. This should be about an eighth of an inch from the edge of the fabrics and can be as simple as a backstitch or as complex as crazy ornate miniature heart shapes. Whatever. It’s totally up to you.
Now we’re getting to the folding. At this point, your square of fabrics should be laid flat with the fabric design that you want to be the exterior fabric facing you. Turn the fabric at an angle so it looks like a diamond shape to you (see fig. 1). Then fold each corner diamond inward until it is touching in the center like the Four Corners out West. Can you see the paper fortune teller game right now? I know, so cool!

Origami Lotus Bag, fig. 1
Your folded flaps should now show only the interior fabric. Those flaps are going to become the interior side panels of the bag. Seam up the four sides of the bag halfway (about four inches), making sure that the interior of the bag is still facing you (see fig. 2). This is important, because you are going to flip the bag so that the seams are facing inward when you are done.

Origami Lotus Bag, fig. 2
The reason we only sewed up the sides of the bag halfway is because to create that lotus-like appearance, the unsewn flaps need to be folded over the outside of the bag. This creates the four origami points that look very similar to the points of a flower petal. To help the four points stay put, we’re going to sew them to the exterior of the bag roughly half an inch from the opening (see fig. 3). This creates a hole or gap large enough to draw ribbons or cord through to make the bag a drawstring one.

Origami Lotus Bag, fig. 3
Lastly, cut two long satin ribbons or silken cord. I usually cut them as long as my arm from fingertip to collarbone, but you’ll need to gauge the length yourself. Take one ribbon and thread it through all four half-inch gaps we sewed at the opening of the bag. Tie the ribbon to itself when it reaches the beginning. At the opposite end from where you started threading the first ribbon, take the second ribbon and repeat the process. Pick up the bag, pull the cords, and watch the bag close! Note: The biggest mistake newbie drawstring bag makers find themselves making is at this point. If you pull your cords and the bag doesn’t close but the ribbons just hang taut, you may have knotted the first ribbon to the second. That’s never going to work so unknot and try again.
Enjoy making your own origami lotus bag!

My Beloved Origami Lotus Bag
UPDATE
I have a second origami lotus bag now, sewn out of some vintage fabric my grandmother brought back with her from India in the 1970s. I am absolutely in love with it – I even had some pale brown ribbon that, just by chance, matched the fabric perfectly! My friend Heidi sewed it for me, and helped me pick out the silken orange interior, which, naturally, I ordered from India. Ah, the magic of the Internet. I had this little pocket that my grandmother had sewn ages ago, as well, so I handstitched an edging to slip the matching ribbon through there as well. Hm, my stitches don’t look to bad in this photo.

The Lotus Temple Bag
