
My favorite project bag is this lotus-shaped drawstring bag I own. It’s square with some design features that reminds me of Japanese origami, the beautiful art of paper folding. I love the way it folds in on itself like those old fortune teller paper games we used to play in school when we were children. The design is both simple yet clever. Pulling the drawstring shuts the bag and creates handles for carrying, all without losing its basic shape. I knew this bag design would be perfect for the vintage fabric my grandmother bought while traveling in India in the ’70s, but when I looked around the Internet in an attempt to make it, I couldn’t find a pattern or tutorial for the design I liked anywhere. I really wanted to have it replicated, so I just decided to write my own pattern! I’m a rudimentary sewer myself, so I assure you this pattern isn’t hard and will gently stretch your abilities. Let’s get sewing!
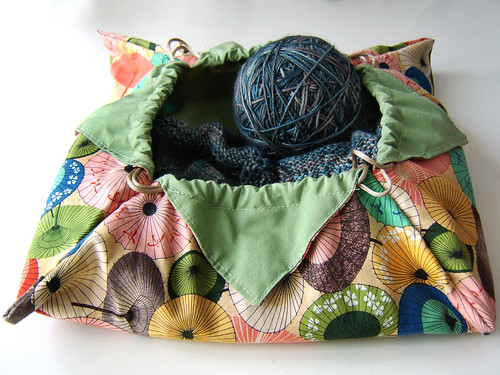
Origami Lotus Project Bag with yarn being knit into a shawl inside of it
You’ll need two matching squares of fabric that are roughly 18 inches square and some matching ribbon. The final product, when all said and done, is going to have a 12-inch wide flat bottom. Note: If you use squares of fabric that are larger you will make a larger bag and if you use squares that are smaller your bag will, consequently, be smaller.
First, take the two pieces of complementary fabrics and place the designs facing each other so you see the wrong side. If you have thin fabrics I recommend added a layer of interfacing of some sort for added strength. Sew the two fabrics together like you would for a pillowcase, leaving yourself a small hole. Then flip the fabric inside-out. Ta-da! Your fabrics are all sewn together and look like a flat, er…thicker piece of fabric. Don’t worry, we’re getting there.
Second, iron your fabric so that it’s easier to work with. This is where the fabric starts to look like origami, and as the Japanese masters will tell you, trying to fold wrinkled paper (or fabric) never works well. Before you start folding, however, we’re going to sew a nice little edging on the flat piece of pillowcase fabric to make it look finished and to keep the seam from sliding around. This should be about an eighth of an inch from the edge of the fabrics and can be as simple as a backstitch or as complex as crazy ornate miniature heart shapes. Whatever. It’s totally up to you.
Now we’re getting to the folding. At this point, your square of fabrics should be laid flat with the fabric design that you want to be the exterior fabric facing you. Turn the fabric at an angle so it looks like a diamond shape to you (see fig. 1). Then fold each corner diamond inward until it is touching in the center like the Four Corners out West. Can you see the paper fortune teller game right now? I know, so cool!

Origami Lotus Bag, fig. 1
Your folded flaps should now show only the interior fabric. Those flaps are going to become the interior side panels of the bag. Seam up the four sides of the bag halfway (about four inches), making sure that the interior of the bag is still facing you (see fig. 2). This is important, because you are going to flip the bag so that the seams are facing inward when you are done.

Origami Lotus Bag, fig. 2
The reason we only sewed up the sides of the bag halfway is because to create that lotus-like appearance, the unsewn flaps need to be folded over the outside of the bag. This creates the four origami points that look very similar to the points of a flower petal. To help the four points stay put, we’re going to sew them to the exterior of the bag roughly half an inch from the opening (see fig. 3). This creates a hole or gap large enough to draw ribbons or cord through to make the bag a drawstring one.

Origami Lotus Bag, fig. 3
Lastly, cut two long satin ribbons or silken cord. I usually cut them as long as my arm from fingertip to collarbone, but you’ll need to gauge the length yourself. Take one ribbon and thread it through all four half-inch gaps we sewed at the opening of the bag. Tie the ribbon to itself when it reaches the beginning. At the opposite end from where you started threading the first ribbon, take the second ribbon and repeat the process. Pick up the bag, pull the cords, and watch the bag close! Note: The biggest mistake newbie drawstring bag makers find themselves making is at this point. If you pull your cords and the bag doesn’t close but the ribbons just hang taut, you may have knotted the first ribbon to the second. That’s never going to work so unknot and try again.
Enjoy making your own origami lotus bag!

My Beloved Origami Lotus Bag
UPDATE
I have a second origami lotus bag now, sewn out of some vintage fabric my grandmother brought back with her from India in the 1970s. I am absolutely in love with it – I even had some pale brown ribbon that, just by chance, matched the fabric perfectly! My friend Heidi sewed it for me, and helped me pick out the silken orange interior, which, naturally, I ordered from India. Ah, the magic of the Internet. I had this little pocket that my grandmother had sewn ages ago, as well, so I handstitched an edging to slip the matching ribbon through there as well. Hm, my stitches don’t look to bad in this photo.

The Lotus Temple Bag

This is lovely! 🙂 thanks for the tutorial..
Oh, you are welcome! Glad you liked it! 🙂
Hi, I Love your bag and would like to try one, but I do have a question. When you say sew the seams half way, I don’t get it. Do you sew then to each other or to the flat bottom? Thanks Laura
You sew the sides to each other. The reason that you are only sewing the sides halfway up is because the rest of the sides (the tip of each corner) are folded over the outside of the bag in a decorative fashion. Hope that helps!
Thanks, That is what I thought. You juse join them and sew. Your design is great and I love the fabric. Thanks again LaurA
This is fantastic. I am totally going to make one next week. Will link back here once blogged. Thanks for the great tute!
What a beautiful pattern, I wish I can sew though! I’d love to share this tutorial with my readers on Peacefully Folding if that is ok with you :]
Go right ahead! 🙂
You might check out the book Omiyage by Kumiko Sudo
She has many designs of this type
This is really adorable. Although I love the plain rectangular bags, this has got to be the most interesting drawstring bag I’ve ever seen. Thanks for sharing the tutorial. I’ll be linking on Facebook.
That is the cutest, most clever thing I’ve ever seen! I want to make one
wow! thanks for making this, I’ve been wanting a lotus bag for a while! Now I can just make my own!
Wow, is that lovely!!! Thank you so much for sharing!!!! I am going to make one right away:) What is the fabric you used? It is stunning.
Laura
This is sweet! Thank you so much for sharing. I seem to have started a collection of bags and their patterns for my own use. I took a class from Kumiko Sudo some time ago in Minnesota. Lots of fun. Great ideas. Check out her books, too. Again, thank you! pj stitches!
What a beautiful bag! My grand-daughter is into Origami and I am going to do one for her to carry her Violin CD’s in. Maybe I’ll do one for me as well??? OK, I talked myself into it!! Thanks.
Pingback: Check me out in The Knitter! | Exchanging Fire
Thank you! I love your bags! Christmas gifts for my “crafty” friends! Can’t wait to explore the fabrics…yours are gorgeous!
Love the bag.
What a lovely bag. I love the idea of a complementary interior. I’m learning tatting and think that this bag would be just the thing and look spiffy with some on the lotus pettels.
Hey, I recognize that bag! Thank you for the compliments! Glad you like it. 🙂
Love it! Thanks for sharing!
These bags just keep getting better! L
Thanks for sharing!
http://torirotsstitches.blogspot.com/2012/04/new-project-bag.html
Gracias por el tutorial. Saludos desde Spain-Andalucia-Granada
That is amazing! I must try it! 🙂
Pingback: Origami Lotus Bag « PILLOWS A-LA-MODE
Love this. Thanks pillowalamode for putting it on your blog.
Pingback: Barbaridade ….aqui no Rio Grande é assim…..WM 10. | ENERGIA-CONSCIENTE – AQUI A DIALÉTICA É A BUSCA DA VERDADE! VEM COMIGO NESSE CAMINHAR! SUA ESSÊNCIA É A ENERGIA DE SUA CONSCIÊNCIA E NÃO ALMA OU ESPÍRITO COMO AS CRENÇAS
Reblogged this on My Devon and commented:
Love this, some one had one at my cross stitch a few weeks ago and I have been looking for the pattern. It had cross stitch on the inside piece that you see when it is opened up. Thanks to pillows a la monde it made my search quicker.
Pingback: Another Origami Lotus Bag « PILLOWS A-LA-MODE
Pingback: Cientistas acrescentaram 1 segundo ao tempo para equilibrar os movimentos da Terra…WM 10. | ENERGIA-CONSCIENTE – AQUI A DIALÉTICA É A BUSCA DA VERDADE! VEM COMIGO NESSE CAMINHAR! SUA ESSÊNCIA É A ENERGIA DE SUA CONSCIÊNCIA E NÃO ALMA OU
Darling! I must try this!
Pingback: Finished Embroidery! | Another Little Crafty Creation
thank you just great for charity work because its so quick and easy and looks great lotus bag
Pingback: SEWING | Pearltrees
Love the bag! I attempted making this, but got stuck on “Seam up the four sides of the bag halfway” Do you do this part of the sewing by hand? It seemed impossible to reach the corner with a sewing machine. Or am I missing something (which wouldn’t surprise me 🙂
Good question – the seaming can be done with the machine. It’s not hard, since the bag is inside out at this point. You are essentially just holding together two edges and then instead of taking your seam to the end, you stop halfway. At that point you can reverse the seam or, if you’d like to do it all in one go, you can fold down the outside points and continue it at an angle across one of the points to create an area that holds the drawstring, then continue down the other half of the bag to make one side of it. Then repeat the procedure with the other two corners of the bag. Hope that helps!
Being a newbie sewer, it was user error…I wasn’t “pinching” the sides together as if sewing a seam, I was trying to keep the sides touching, slipping the bag into my machine & sewing a zig zag stitch over both sides, which is why I couldn’t reach the corners….I was just a bit “backwards”, but I figured it out by looking at your finished bag, still on a learning curve here! I know when I do it right this time, it’ll be great! Thanks & sorry I was so confused
can you make a video on this bag step by step
No, sorry, I can’t. I don’t sew by machine. I just made the pattern. 🙂
Pingback: Útiles para tejedores III « La Maison Bisoux
Pingback: Renna's facs | Pearltrees
Pingback: Tools/ Outils |
Pingback: couture | Pearltrees
Pingback: Útiles para tejedores III | La Maison Bisoux
Found this pattern a few months ago and made it up today. Thank you for the pattern and the very good directions very easy to follow even though I’m not a sewer. It will be great for my tatting.
Lyn
I found this pattern ages ago and thought how neat the bag was. I decided to use it for my church craft group and all the old ladies not only finished their bag but they all loved them too. So from all of us Thank you so much.
Pingback: Challenge #12 – Origami Bag | Little Kiwis
Pingback: Sticks and Strings for the Soul – Live Momentously
Pingback: FREE Project – Origami Drawstring Bag / Beth Ann Williams